|
Greenland Laminte Flooing Installation Remark
-By FloorUS.com
Greenland Laminate Installation
Installation
Installation Instructions: (Please read through before starting installation) Laminate
panels are easy to install. No gluing is required with simple interlocking panel
system. Ideal for either the professional installer or the home handyman who wants
a great looking installation.

Tools and Accessories:
- Foam underlayment
- 6-mil (0.2mm) polyethylene moisture barrier (if necessary)
- Moisture-proof self-adhesive tape
- Trim moldings (if required)
- Level
- Square
- Spacers
- Pencil
- Tape measure
- Electric saw
- Dust mask
- Safety glasses
- Gloves
Preliminary
- Remove wrapping. Lay panels out flat at room temperature for 48
hours. Check all panels for defects. Claims cannot be made for panels already laid.
- Ensure the surface to be covered with panels is clean, smooth, and
level. Uneven areas must be leveled.
- Do not install over carpets. Remove carpet along with any residual
adhesive material and install on smooth, firm surface.
Moisture: Do not install laminate panels in bathrooms, shower rooms,
or other rooms exposed to excessive moisture.
Concrete Surfaces: It is recommended that a moisture barrier be
placed over all concrete floors, even if no moisture emissions are apparent.
Moisture Barrier: To protect panels against moisture from surfaces
where moisture is likely to occur, a moisture barrier must first be placed over
the base surface. Use 6-mil (0.2mm) polyethylene film. Overlap the edges of the
polyethylene by a minimum of 8 inches and seal the junction with moisture proof
self-adhesive tape. Use on concrete floors and all floors below grade or other areas
where condensation or moisture emisissions may occur.
Radiant Heat Floors: A moisture barrier should be installed over
floors with radiant heat. Before laying the barrier, turn heat down to 15°C
(60°F) on week before. Keep temperature below 27°C (80°F) at all times.
Underlayment: Laminate panels must be installed on top of underlayment.
Use a good quality foam underlayment. Underlayment seams should not overlap and
should be taped with self adhesive tape. If installing both a moisture barrier and
underlayment, put underlayment on top of the moisture barrier, or use a reliable
combination product if preferred.
Sawing Panels: Wear protective mask, safety glasses and gloves
when sawing panels. Always cut laminate panels with the or side facing down. An
electric circular saw or miter saw with a finishing blade is recommended.
Moldings: Transition moldings in matching trims can be used for
the following purposes:
- End molding: Use for transition from laminate panel floor to another
type of flooring.
- Quarter round: Use at base of wall. NOTE: Always fasten quarter
round molding to the wall, never to the floor.
- Reducer: Use in transition from laminate floor to linoleum or other
type of hard surface.
- Stair-nose: Use at the edge of each step in a staircase.
- T-Molding: Use in doorways, between rooms are adjacent floors, and
expansion joints.
Measurements: Be sure to measure all floor surfaces
with the required expansion gaps (See Expansion below.) Panel tongues are 5mm and
must be part of the measurement when considering expansion space. If preferred,
you can cut off the tongue facing the expansion gap on the first row. It is also
important to measure the room for squareness. If walls are not square, it is recommended
that you use the longest, straightest wall as your reference line, and draw perpenicular
ines from it. TIP: Draw your line at a distance from the wall more than width of
the laminate panel so it is visible after you position your first row of panels.
It is recommended that all installed panels be at least 12 inches (30.5 cm) in length.
TIP: Measure the length of a row and cut the first panel of the row according to
the desired for the last panel of the row.
Direction of Panels: For appearance, panels are normally installed
so the length direction of the panels is the same as the length direction of the
room. This will also reduce the amount of cutting required.
Preparation:
- Measure doors for clearance of installed panels. Cut away doorframe
at bottom if necessary.
- Remove baseboards if necessary.
- Surfaces should be clean, smooth, and level. Surfaces with slopes
steeper than 12.5 mm/ 1.62m (1/2"/5') must be leveled.
- Measure the perimeter of the room to determine room squareness,
and the required width of the last row of panels. Allow for expansion gaps along
each wall.
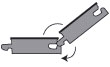
- Sapphire tongue-and-groove panels are easily installed without glue.
Simply attach the tongue on one panel to the groove side of the other panel and
the panels will lock snugly together. Start with the first panel flat on the floor,
or surface up, and the groove side away from the wall. Insert the tongue of the
second panel partially into the first, while holding the second panel at about a
20° angle from the floor. Press the second panel down flat and the tongue will
lock firmly into place. (Reverse the prodecure to release.) Continue in a similar
fashion for the remaining panels. TIP: After you have locked a few rows in place,
you may find it easier to stand on the installed panels when setting the next row
in place.
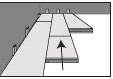
Expansion: Because changes in heat and humidity will cause laminate
panels to expand and contract in both length and width, expansion spaces must be
allowed on all sides of the installed floor. The use of spacers inserted between
the panels and perimeter walls is recommended. The spacers should be removed after
the panels are installed and before molding are attached to the walls
For rooms up to 25 feet (7.6 meters) in width and 40 feet (12.2 meters) in length,
allow for expansion between 3/8" and 5/8" (10mm to 16mm) along each wall.
Expansion joints: For floors more than 25 feet (7.6 meters) wide
or more than 40 feet (12.2 meters) long, an additional expansion joint must be inserted.
Expansion joints are also required in doorways, and between adjoining rooms or areas
where adjacent is installed. Use a T-molding to cover the expansion joint.
Install at a room temperature of 65°F (18°C)
Pipes and other obstacles: When installing a laminate panel around
a pipe or other obstacle, leave the same expansion gap as you would next to a wall.
Measure and precut the affected panel. If there is condensation from the pipe, cut
the panel so there is sufficient space to keep the panel dry. It is recommended
that you treat the exposed edge of the panel to protect it from pipe condensation.
TIP: Fill the space around a pipe with caulking in order to protect the exposed
(cut) edge of the panel.
Installation:
First Row
- Measure the row before laying the first panel. Cut the first panel
according to the length required for the last panel. (See Measurements above.)
- Measure for straightness and cut the panels to make sure the inner
edge of the first row panels is square before starting second row. TIP: Measure
the last row for panel width first. Then cut first row panels to the same width
as last row, recommended not less than 2 inches.
- Position the first row panels along one wall, leaving space for
expansion between the panel and the wall.
- Lock the ends of the panels together until the first row is finished.
Second Row
- The first panel of the second row should be long enough so the ends
of the second row panels reach past the end seams of the first row panels. TIP:
If the remaining section of the last panel of the first row is long enough, use
it for the first panel of the second row.
- Line up the first panel of the second row so the outside end is
even with the outside end of the first panel of the first row. After locking in
place, lay the remaining panels of the row by first locking the long side in place
and then tapping the end of the panel to slide it firmly into place at its end.
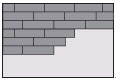
Middle Rows
- Lay each of the panels of the remaining middle rows in the same
manner. In order to stagger the end seams of each panel, it is recommended that
the length of the first panel of each row be varied.
Last Row
- Because the width of the last row may be less than that of the previous
rows, it may be necessary to cut the panels of the last row to the appropriate width
(See TIP for first row).
Precautions: Wood dust can be hazardous to your health. Wood products
including fiberboard and engineered wood products produce wood dust when sawn, sanded,
or machined. Airborne wood dust can cause health problems and can also be an explosive
hazard. Power tools should be equipped with dust collectors, and precaution should
be taken to prevent ignition. In the United States, the National Institute for Occupational
Safety and Health (NIOSH) recommends limiting wood dust exposure to prevent the
following health problems: eye and skin irritation, allergy, reduced lung function,
asthma, and nasal cancer. Use an appropriate NIOSH approved dust mask and safety
glasses when sawing, sanding, or machining wood products. In countries outside the
USA, consult the relevant national occupational health and safety authority for
the appropriate standard in protective equipment.
|